Setting Up a Cairo 1 Dev Environment
David Barreto
The following instructions are tested for Ubuntu and MacOS. Whenever there's a discrepancy between the two OS, you'll see IF ELSE-IF meta instructions.
Prerequisites
Before you start, make sure to have this dependencies installed
- System: curl, git, zsh (optional), oh-my-zsh (optional), tree (optional)
- Apps: VSCode, Brave (or Chrome or Firefox)
- Wallets: Braavos or Argent X
Installing Rust
To manage Rust (install different versions and update it) we need to install rustup (docs)
~ $ curl --proto '=https' --tlsv1.2 -sSf https://sh.rustup.rs | sh |
Load shell configuration to active terminal (or restart the terminal)
~ $ source "$HOME/.cargo/env" |
Verify that rustup is installed and active
~ $ rustup --version >>> rustup 1.25.2 (17db695f1 2023-02-01) |
Installing Cairo 1 CLI
The latest version of the Starknet CLI (cairo-lang) doesn't include the Cairo 1 compiler yet. In order to compile a Cairo 1 smart contract to Sierra, we need to download the new Cairo 1 compiler written in Rust (cairo).
We are going to clone the Cairo 1 repo in the HOME directory just for convenience as we want to make the new compiler available to our PATH variable so we can call the "starknet-compile" command from any location.
~ $ git clone https://github.com/starkware-libs/cairo/ ~/.cairo |
Before compiling the binaries, we need to make sure to use the latest tagged version of the repo instead of using "main" to make sure we are only using features supported by Starknet testnet.
~ $ cd ~/.cairo .cairo $ git checkout tags/v1.0.0-alpha.6 |
Now we can build the binaries from the Rust source
.cairo $ cargo build --all --release |
Add Cairo 1 binaries to PATH by modifying .zshrc
.cairo $ echo 'export PATH="$HOME/.cairo/target/release:$PATH"' >> ~/.zshrc |
Activate new shell configuration (or restart terminal)
.cairo $ source ~/.zshrc |
Verify that Cairo 1 binaries can be found
.cairo $ starknet-compile --version >>> cairo-lang-starknet 1.0.0-alpha.6 |
Test Compiler (Ubuntu & MacOS)
Create a project folder
~ $ mkdir ~/starknet && mkdir ~/starknet/test ~ $ cd ~/starknet/test test $ mkdir src sierra test $ touch src/example.cairo |
Folder structure
test $ tree . >>> . ├── sierra └── src └── example.cairo |
Create empty smart contract to test if compiler works
~/starknet/test/src/example.cairo
#[contract] mod SimpleStorage {} |
Compile smart contract to sierra
test $ starknet-compile src/example.cairo sierra/example.json |
It works!
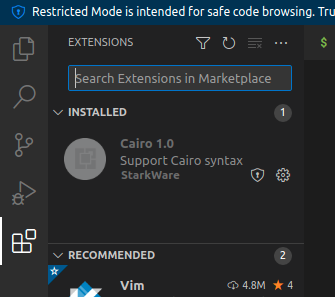
Installing Cairo 1 VSCode Extension
Install NodeJS
IF UBUNTU
Ubuntu 22 has Node v12 as it's latest package so we need to update the apt reference to Node v19 which is the current latest version
~ $ curl -sL https://deb.nodesource.com/setup_19.x | sudo -E bash - |
Before installing the first system wide dependency, we need to update our package index
~ $ sudo apt update |
Now we can get NodeJS by using apt
~ $ sudo apt install -y nodejs |
ELSE IF MACOS
Get node from homebrew
~ $ brew update ~ $ brew install node |
END
To verify the installation of node and npm
~ $ node -v >>> v19.8.1 ~ $ npm -v >>> 9.6.4 |
Compile Extension
Install globally the VSCode extension manager with npm
~ $ sudo npm install -g @vscode/vsce |
Navigate to the folder where the vscode extension for Cairo 1 is located within the cairo repo
~ $ cd ~/.cairo/vscode-cairo |
Install project dependencies from npm
vscode-cairo $ npm install |
To install the extension on vscode, we have to first turn it into a package
vscode-cairo $ vsce package |
Install & Configure
Now the package can be installed in vscode using the cli
vscode-cairo $ code --install-extension cairo1*.vsix >>> Extension 'cairo1-1.0.0.vsix' was successfully installed. |
Verify that the Cairo 1 extension was installed on vscode
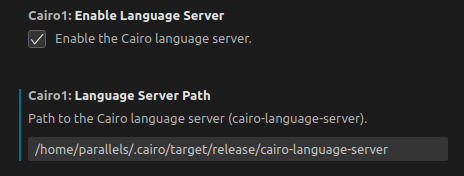
Configure the extension to use the language server
vscode-cairo $ cd ~/.cairo/target/release release $ pwd >>> /home/parallels/.cairo/target/release |
Close and restart VSCode for the changes to take effect
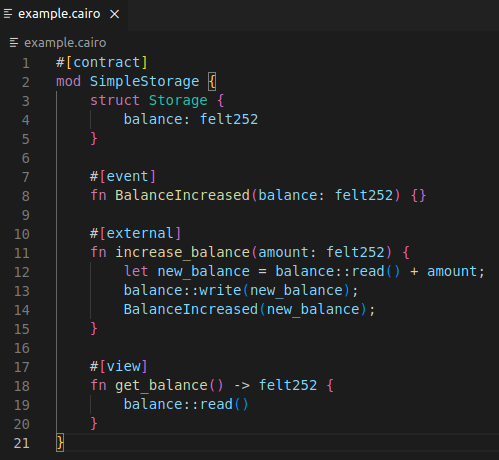
Improve the smart contract
~/starknet/test/src/example.cairo
#[contract] mod SimpleStorage { struct Storage { balance: felt252 } #[event] fn BalanceIncreased(balance: felt252) {} #[external] fn increase_balance(amount: felt252) { let new_balance = balance::read() + amount; balance::write(new_balance); BalanceIncreased(new_balance); } #[view] fn get_balance() -> felt252 { balance::read() } } |
If the extension is working you should see the syntax highlighter
Compile new version of the smart contract to Sierra
vscode-cairo $ cd ~/starknet/test test $ starknet-compile src/example.cairo sierra/example.json |
Installing Python 3.9
IF UBUNTU
Add the deadsnakes PPA to your system
~ $ sudo add-apt-repository -y ppa:deadsnakes/ppa |
Update the package list again to include the packages from the newly added PPA
~ $ sudo apt update |
Install the dev version of Python 3.9 and the virtual environment extension
~ $ sudo apt install -y python3.9-dev python3.9-venv |
ELSE IF MACOS
Install python from homebrew
~ $ brew install python@3.9 |
END
Verify that python was installed correctly
~ $ python3.9 --version >>> Python 3.9.16 |
Installing Cairo CLI
Install Cairo's CLI required global dependency
IF UBUNTU
~ $ sudo apt install -y libgmp3-dev |
ELSE IF MACOS
~ $ brew install gmp |
END
Create a python virtual environment using python3.9 in the project folder
~ $ cd ~/starknet/test test $ python3.9 -m venv venv |
Activate the virtual environment
test $ source venv/bin/activate |
Upgrade pip to its latest version before attempting to install any package
(venv) test $ pip install --upgrade pip |
Install Cairo CLI (cairo-lang)
IF UBUNTU
(venv) test $ pip install cairo-lang |
ELSE IF MACOS
(venv) test $ CFLAGS=-I`brew --prefix gmp`/include LDFLAGS=-L`brew --prefix gmp`/lib pip install cairo-lang |
END
Verify installation
(venv) test $ starknet --version >>> starknet 0.11.0.2 |
Configure the Cairo CLI
Configure the env variables used by the CLI to use the Cairo 1 compiler instead of the default Cairo 0 compiler when declaring a smart contract.
~/.zshrc
IF UBUNTU
# Use Starknet testnet export STARKNET_NETWORK=alpha-goerli # Set the default wallet implementation to be used by the CLI export STARKNET_WALLET=starkware.starknet.wallets.open_zeppelin.OpenZeppelinAccount |
ELSE IF MACOS
# Use Starknet testnet export STARKNET_NETWORK=alpha-goerli # Set the default wallet implementation to be used by the CLI export STARKNET_WALLET=starkware.starknet.wallets.open_zeppelin.OpenZeppelinAccount # Set the path to the Cairo 1 compiler binary. Adapt this path to fit your installation if needed export CAIRO_COMPILER_DIR=~/.cairo/target/release/ |
END
Activate new env variables
~ $ source ~/.zshrc |
Create an Account
Return to the project folder and activate the environment
~ $ cd ~/starknet/test test $ source venv/bin/activate |
Create an account called "v0.11.0.2"
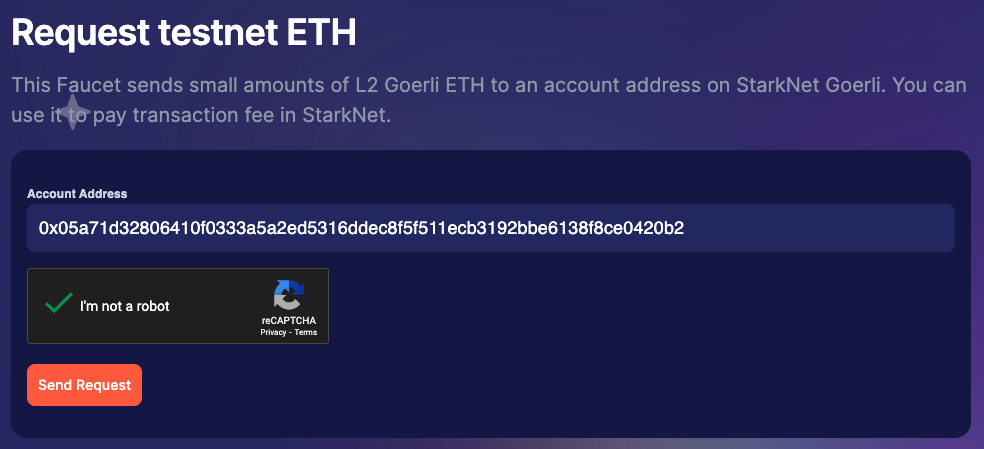
(venv) test $ starknet new_account --account v0.11.0.2 >>> Account address: 0x05a71d32806410f0333a5a2ed5316ddec8f5f511ecb3192bbe6138f8ce0420b2 Public key: 0x04a946e1cb7afb01c751f1147feb6642ba2cedffda40b33e9356a7777bee6bcb Move the appropriate amount of funds to the account, and then deploy the account by invoking the 'starknet deploy_account' command. |
Send test ETH on Goerli to the account address using the faucet
Wait until the transaction enters the state "PENDING" before trying to deploy the account.
Deploy the account
(venv) test $ starknet deploy_account --account v0.11.0.2 >>> Sending the transaction with max_fee: 0.001331 ETH (1330645047319751 WEI). Sent deploy account contract transaction. Contract address: 0x05a71d32806410f0333a5a2ed5316ddec8f5f511ecb3192bbe6138f8ce0420b2 Transaction hash: 0x15128519a0d69f48020d6aa31935775b8731353b9018b1cdf76c157b8f6333a |
Deploy Smart Contract
At this point the smart contract is already compiled to Sierra. So we need to first declare it.
(venv) test $ starknet declare --contract sierra/example.json --account v0.11.0.2 >>> Got BadRequest while trying to access https://alpha4.starknet.io/feeder_gateway/simulate_transaction?blockNumber=pending&skipValidate=false. Status code: 500; text: {"code": "StarknetErrorCode.CLASS_ALREADY_DECLARED", "message": "Class with hash 0x9b09ce076e1789d2901b83b27f88b9dfdc5d8952ee694f0ad6416640839af7 is already declared.\n0x297b2c8e38092143e72271aa27e616df208337c27c821e1f4e85d320657a2f6 != 0"}. |
This is an expected error as the smart contract was previously declared by someone else already.
We can move on to deploy an instance using the class hash
(venv) test $ starknet deploy --class_hash 0x9b09ce076e1789d2901b83b27f88b9dfdc5d8952ee694f0ad6416640839af7 --account v0.11.0.2 >>> Sending the transaction with max_fee: 0.000503 ETH (502887840980218 WEI). Invoke transaction for contract deployment was sent. Contract address: 0x0679054ccf6c2e0eb2bb3d979a0d6952f9bc3ae0a43831a22267e6146600ece7 Transaction hash: 0x22100fd5b53827194cac5aa06b9e2746b59b0e650e19c21c4aa18be50e60245 |
Interacting with the smart contract using Braavos and Starkscan seems to work to increase the balance
IT WORKS!